Quickstart
This guide walks you through your first session in Kilo Desktop. If you haven't installed the app yet, see Installation.
Complete onboarding
On first launch, a short setup wizard walks you through the setup steps.
1. Review the terms of service
Review and accept Kilo's terms of service. You need to accept them before you can use the app.
2. Connect to Kilo
Sign in to your Kilo account to use frontier models, credits, and organization settings through the Kilo Gateway. You can skip this step and connect later from Settings.
A Kilo account is also required to use conda environments, the local model server, and notebooks. You can sign in during onboarding or later from the Account section in Settings.
3. Choose an autonomy level
Choose whether you want Kilo to operate with high autonomy or review its work first, pausing to show its plan and ask for your approval before it edits files or runs commands. High autonomy is the default behavior of the Kilo Code agent.
4. Create a workspace
A workspace scopes a session to one or more folders on your machine. Add the folder(s) you want the agent to work in; the agent's file access, terminal, and git operations all run inside the workspace. You can add more workspaces anytime.
5. See what you can do
A short tour of Kilo Desktop's features finishes setup.
Navigate the home screen
When Kilo Desktop opens, you land on the New Session page in the workspace you created during setup.
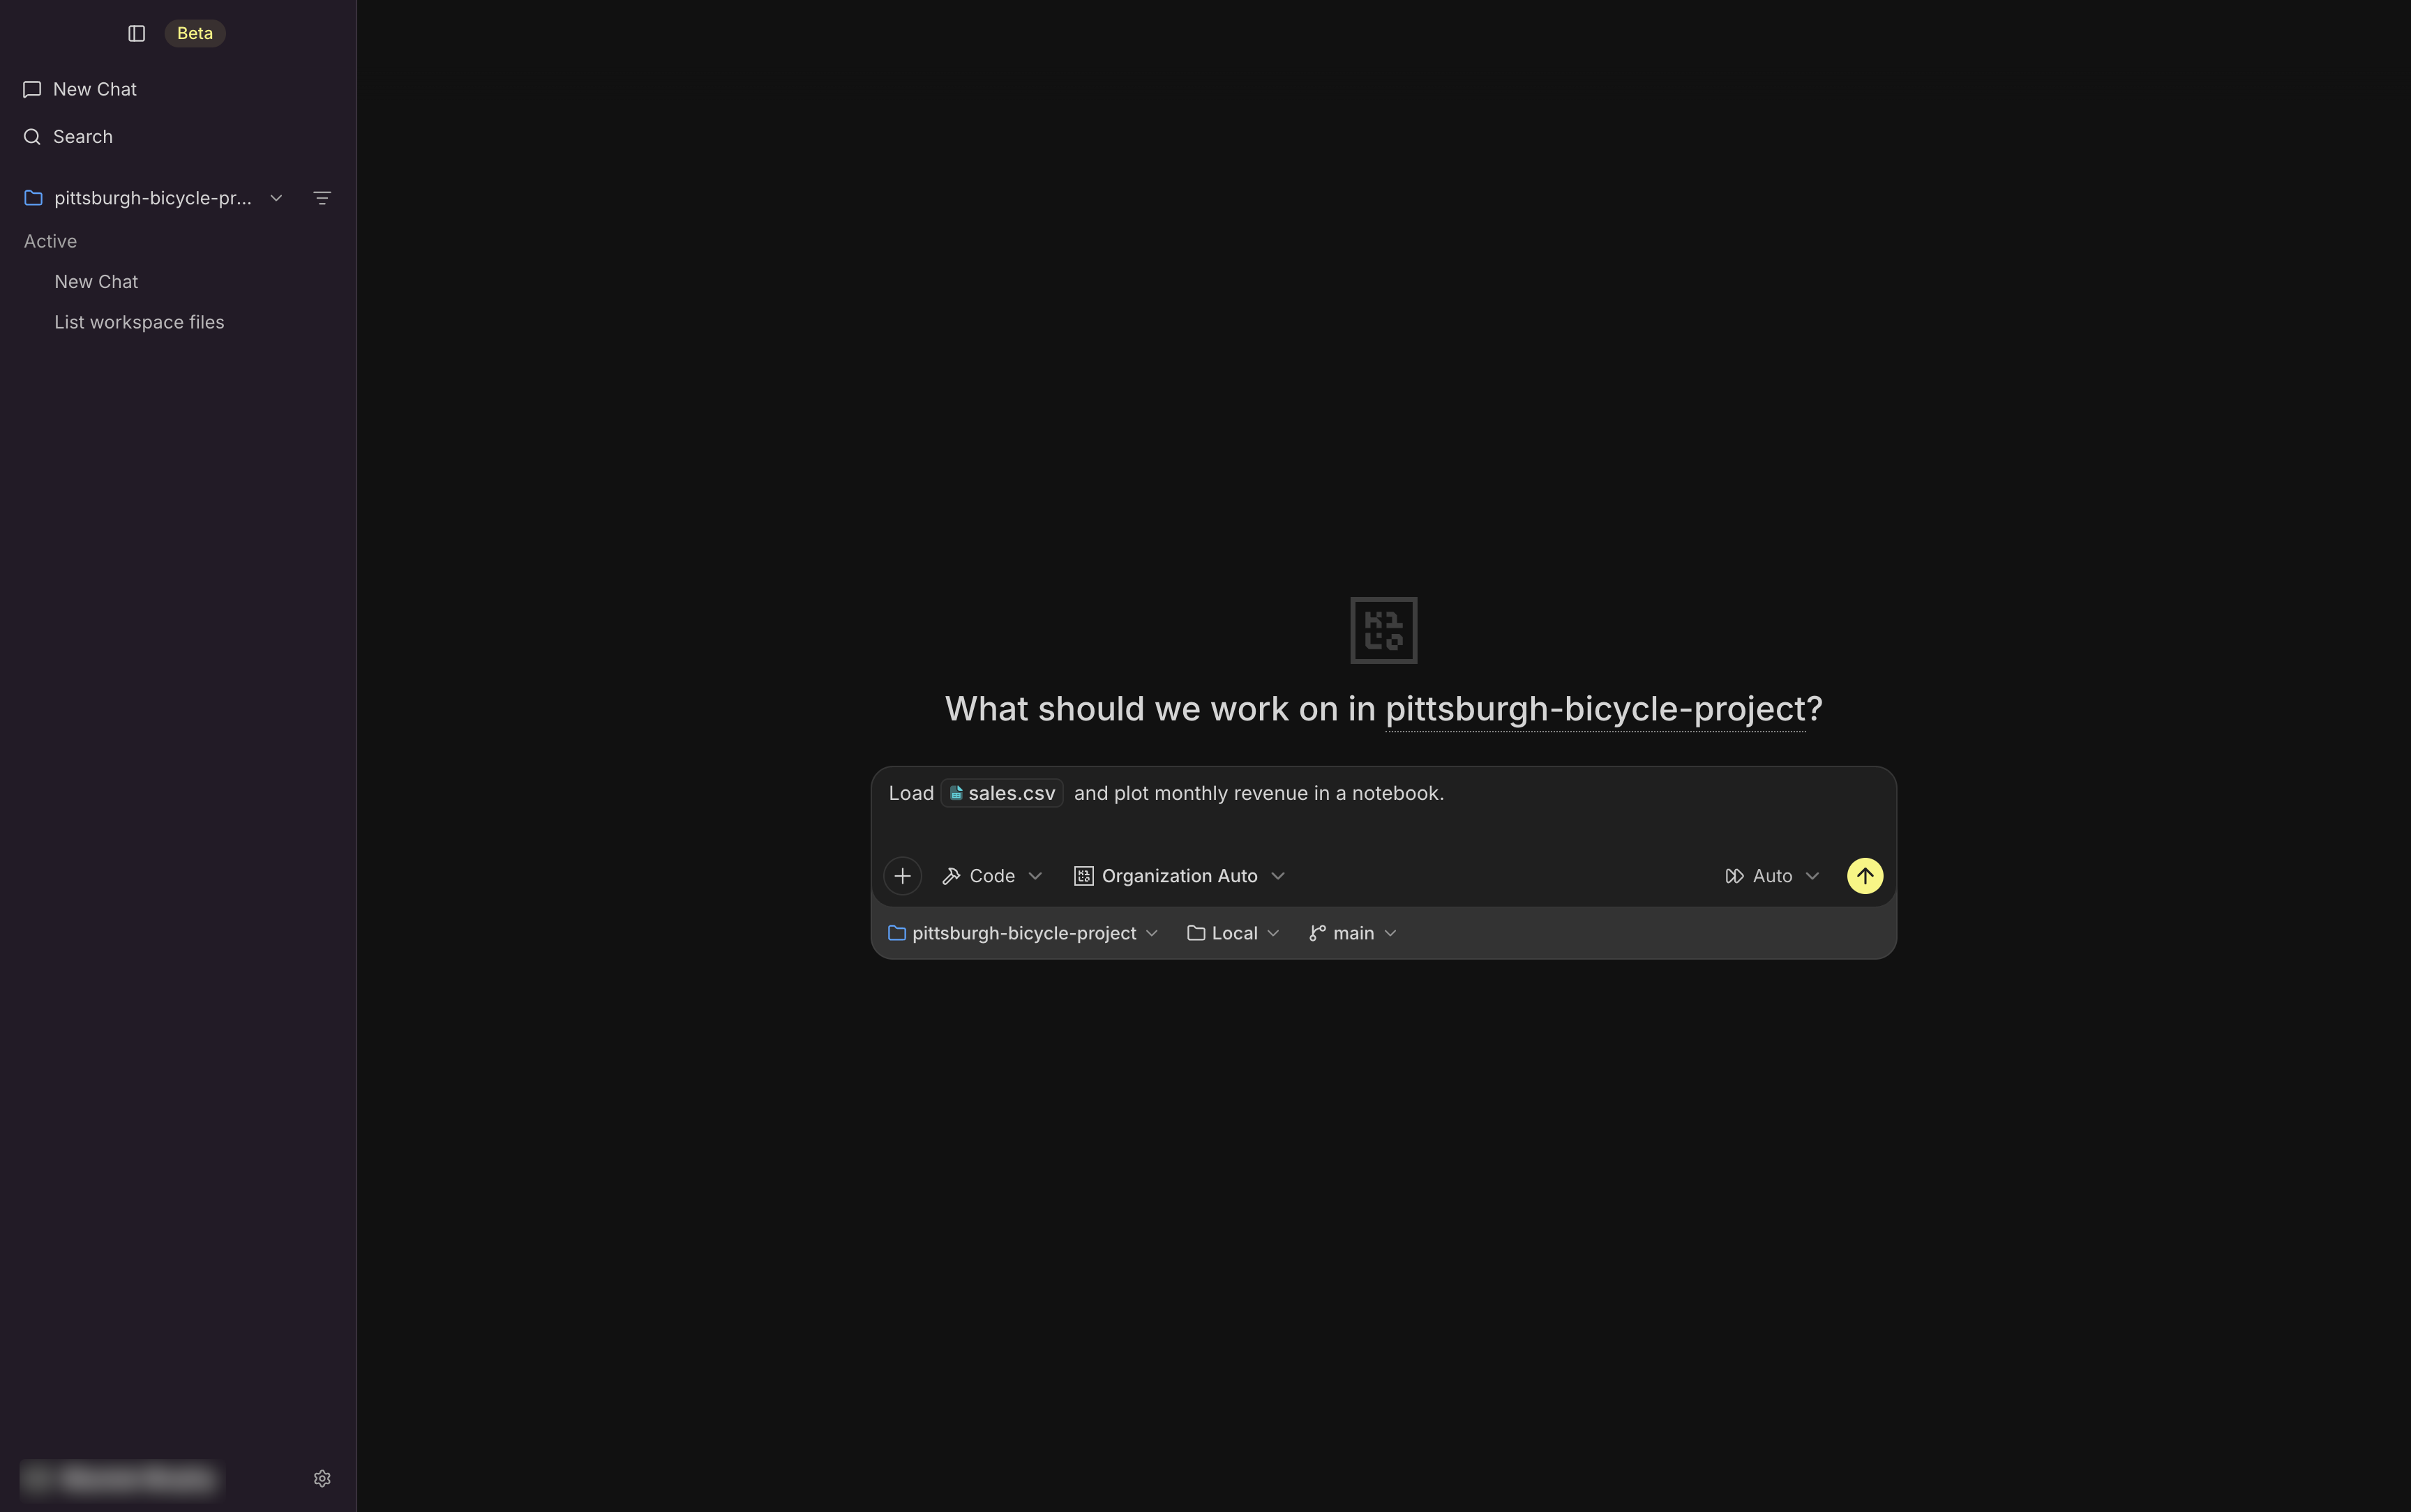
Sidebar
The sidebar on the left manages your sessions and workspaces.
New session (⌘N on macOS, Ctrl+Shift+N on Windows/Linux) opens the New Session page in the workspace selected in the sidebar.
Search (⌘K / Ctrl+Shift+K) finds past sessions and workspaces.
Workspace filter — choose All workspaces, No workspace (sessions that aren't in a workspace), or a single workspace. You can also create a New workspace here.
Session list options — organize the list:
- Grouping: Status, Workspace, or Updated.
- Ordering: Updated or Title.
- Show: choose what each row shows (Workspace, Updated, PR).
- Filters: by Status (All, Needs attention, Working, Idle, Archived) or by Pull request (All, Any PR, Open PR).
Collapse All / Expand All and Reset view are in the same menu.
If a folder in a workspace has been moved, renamed, deleted, or is on a drive that isn't connected, Kilo Desktop shows a warning icon next to that workspace in the workspace filter and in the Select workspace menu. The chat's message box shows the same warning for the workspace that chat uses. Select the icon to open Edit workspace, where the missing folder is marked This folder is unavailable. Select its new location or remove it. Use Add folder to choose the folder's new location and remove the old entry with ×. If the folder you removed was Primary, the first remaining folder becomes primary, so select Make primary on the right folder if needed. Then select Save.
Start a session
The New Session page asks What should we work on in workspace? Above the message box, pick the Workspace, add a New workspace, or choose No workspace to work without one. For a git repository, Use sets where the session runs:
- Local repository — work in the repository already on your machine. The Branch field switches or creates branches.
- New worktree — create a separate copy for the session from the Base branch you pick.
- Existing worktrees — reuse a worktree that's already there.
Kilo Desktop remembers your Use choice for each workspace. If the workspace folder isn't a git repository yet, select Initialize Git. See Git integration.
Send a message to start with the agent. To start without the agent, select a tool under the message box: Terminal, Notebook, Browser, or Files.
Manage sessions
Hover a session and select … (More), or right-click it, to Pin or Unpin, Rename, Archive, or Delete it.
- Pin keeps a session in the Pinned group at the top of the list. Press ⌥⌘P (macOS) or Ctrl+Alt+P (Windows/Linux) to pin or unpin the open session.
- Archive moves a session into the Archived group. Select Restore on an archived session to bring it back.
- Delete asks you to confirm (Delete this session?). It permanently removes the session and its history. If the session is the last one using a worktree, Kilo Desktop asks Delete session and worktree? instead, listing the session and the worktree's branch. Choose Keep worktree to delete only the session, or Delete both. Deleting the worktree loses its uncommitted changes and unpushed commits.
To work on several sessions at once, ⌘-click (macOS) or Ctrl-click (Windows/Linux) to add or remove a session, and Shift-click to select a range. With a session focused, use the Up and Down arrow keys to move between sessions, Shift+Up or Shift+Down to extend the selection, and ⌘A (macOS) or Ctrl+A (Windows/Linux) to select every visible session. Right-click the selection, or select … in the N selected bar, to pin, archive, restore, or delete them together. Archive skips sessions that are working or waiting for you. Delete asks once for the whole selection (Delete N sessions?); if it leaves a worktree unused, choose Keep worktree or Delete all. Press Esc or click an empty part of the list to clear the selection.
Settings
Access the app settings by clicking the settings icon at the bottom of the sidebar. See General settings and AI settings for details.
Chat with the agent
The rest of the window is where you chat with the agent. Type a message, use @ to mention workspace files, or / to run a command. Type /compact between turns to summarize the chat so far and free up context.
Input controls
The controls around the input let you:
- Add an attachment with the + button.
- Choose an agent to set how it approaches your request. Pick one of the default agents: Code, Plan, Ask, Debug, or Architect. See Using agents for what each one does.
- Select autonomy level for the agent. With Manually approve, Kilo asks before each file edit or command; with Automatically approve, it proceeds on its own without requesting permission.
- Pick a model for the chat. The available models depend on how you're signed in and which providers you've connected. The list can include Kilo Gateway models, provider models you've added, or a local model you've added. The picker labels free models Free and models that use your own API key BYOK. Use the filter to show only free models. Free models may use your data for training; see Privacy. Each chat keeps its own model and effort. New chats start with the model you last picked for a new chat.
Below the input, an open chat shows where its changes go: Local or the name of its worktree. You choose this when you start the session.
Send your first message
Enter your message and send it to start the conversation. See What you can ask for prompts to get you started. The input grows as you type, up to half the chat's height. Once it's full, drag the handle on its top edge to make it taller, up to 70% of the chat; double-click the handle to reset it.
While the agent is working, you can keep typing and select Queue (or press Enter) to line up your next message. Queued messages appear above the input and are sent one at a time when the agent finishes. Select Send now on a queued message to stop the agent's current turn and send that message next. Stop generating pauses the queue. Queued messages and anything you've typed but not sent stay with the session when you switch sessions, move a tab into its own window, or reload the window. They're cleared when you quit Kilo Desktop.
Hover a queued message for more controls:
- Edit queued message changes its text. Press Enter (or select Save) to keep the change, or Esc (or Cancel) to discard it. The queue waits while you edit, and its header shows · Editing.
- Drag to reorder — when more than one message is queued, drag a message by its handle to change the order, or focus the handle and use the up and down arrow keys.
- Delete queued message removes it.
Select Pause queue in the queue header to hold queued messages after the agent finishes; the header shows · Paused. Select Resume queue to continue sending.
Review a plan
When the Plan (or Architect) agent writes a plan, a plan card appears in the chat with a preview. Select View Plan to read the full plan in a Plan tab beside the chat, then Approve it to let the agent start work. To change the plan, type your feedback and select Refine. Your feedback appears in the chat, and the agent revises the plan. Each revision gets its own card, and an open Plan tab switches to the newest revision once it's ready.
Pages and diagrams in replies
When a chart, table, or mockup says more than prose, the agent can show an HTML page right in its reply. The page follows your light or dark theme, and tall pages scroll inside the frame. Hover the page to see its title and two buttons:
- Save to workspace — saves the page as an
.htmlfile in the chat's workspace, named after the page title. Kilo Desktop never overwrites a file; if the name is taken, it adds a number, such asChart 2.html. Select Open in the confirmation to view the saved page in a Browser tab. - Open in viewer — opens the page in the chat's Viewer tab.
Pages can't reach the network, except to load scripts from a few public CDNs (jsDelivr, unpkg, cdnjs, Plotly, Bokeh, and HoloViz). When you click a link in a page, Kilo Desktop asks Open site in your browser? and opens it in your default browser only if you select Open.
When the agent draws a diagram — a flowchart, sequence diagram, Gantt chart, and so on — Kilo Desktop renders it as a Mermaid diagram card labeled with its type. Select Show source to see the Mermaid code (Show diagram switches back), or Copy to copy it. Select Open in viewer, or click the diagram, to open it in the Viewer tab.
Images in the chat — your attachments, images in replies, screenshots the agent's tools return, and image files the agent saves — also open in the Viewer when you click them. In the Viewer:
- Zoom with the mouse wheel, a pinch, Zoom in / Zoom out, or the + and − keys. Press 0 or select Fit to window to fit, and Actual size (1:1) for full size. Drag to pan.
- Use ← and → (or Previous / Next) to move between the chat's diagrams, images, and pages.
- Download saves an image, or exports a diagram as SVG or PNG. Copy source copies a diagram's Mermaid code.
Find text
Press ⌘F (macOS) or Ctrl+F (Windows/Linux) to search the chat transcript (Find in transcript), an open Plan tab (Find in plan), or a rendered Markdown or Mermaid preview in Files (Find in file). The search applies to the tab you're working in. The bar shows the match count; press Enter for the next match and Shift+Enter for the previous one, toggle Match case (Aa), and press Esc to close it. In the code editor, ⌘F / Ctrl+F opens the editor's own search instead.
Keyboard shortcuts
Press ⌘/ (macOS) or Ctrl+/ (Windows/Linux) to see all keyboard shortcuts. You can change them in General settings. For example, press ⌘L (macOS) or Ctrl+Shift+L (Windows/Linux) to focus the message input, and Shift+Tab to switch agents.
Work in tab groups
Tab groups let you work in the same workspace alongside the chat. Each tab group holds one or more tabs. They're available as soon as a session is open, including sessions you start from a tool on the New Session page.
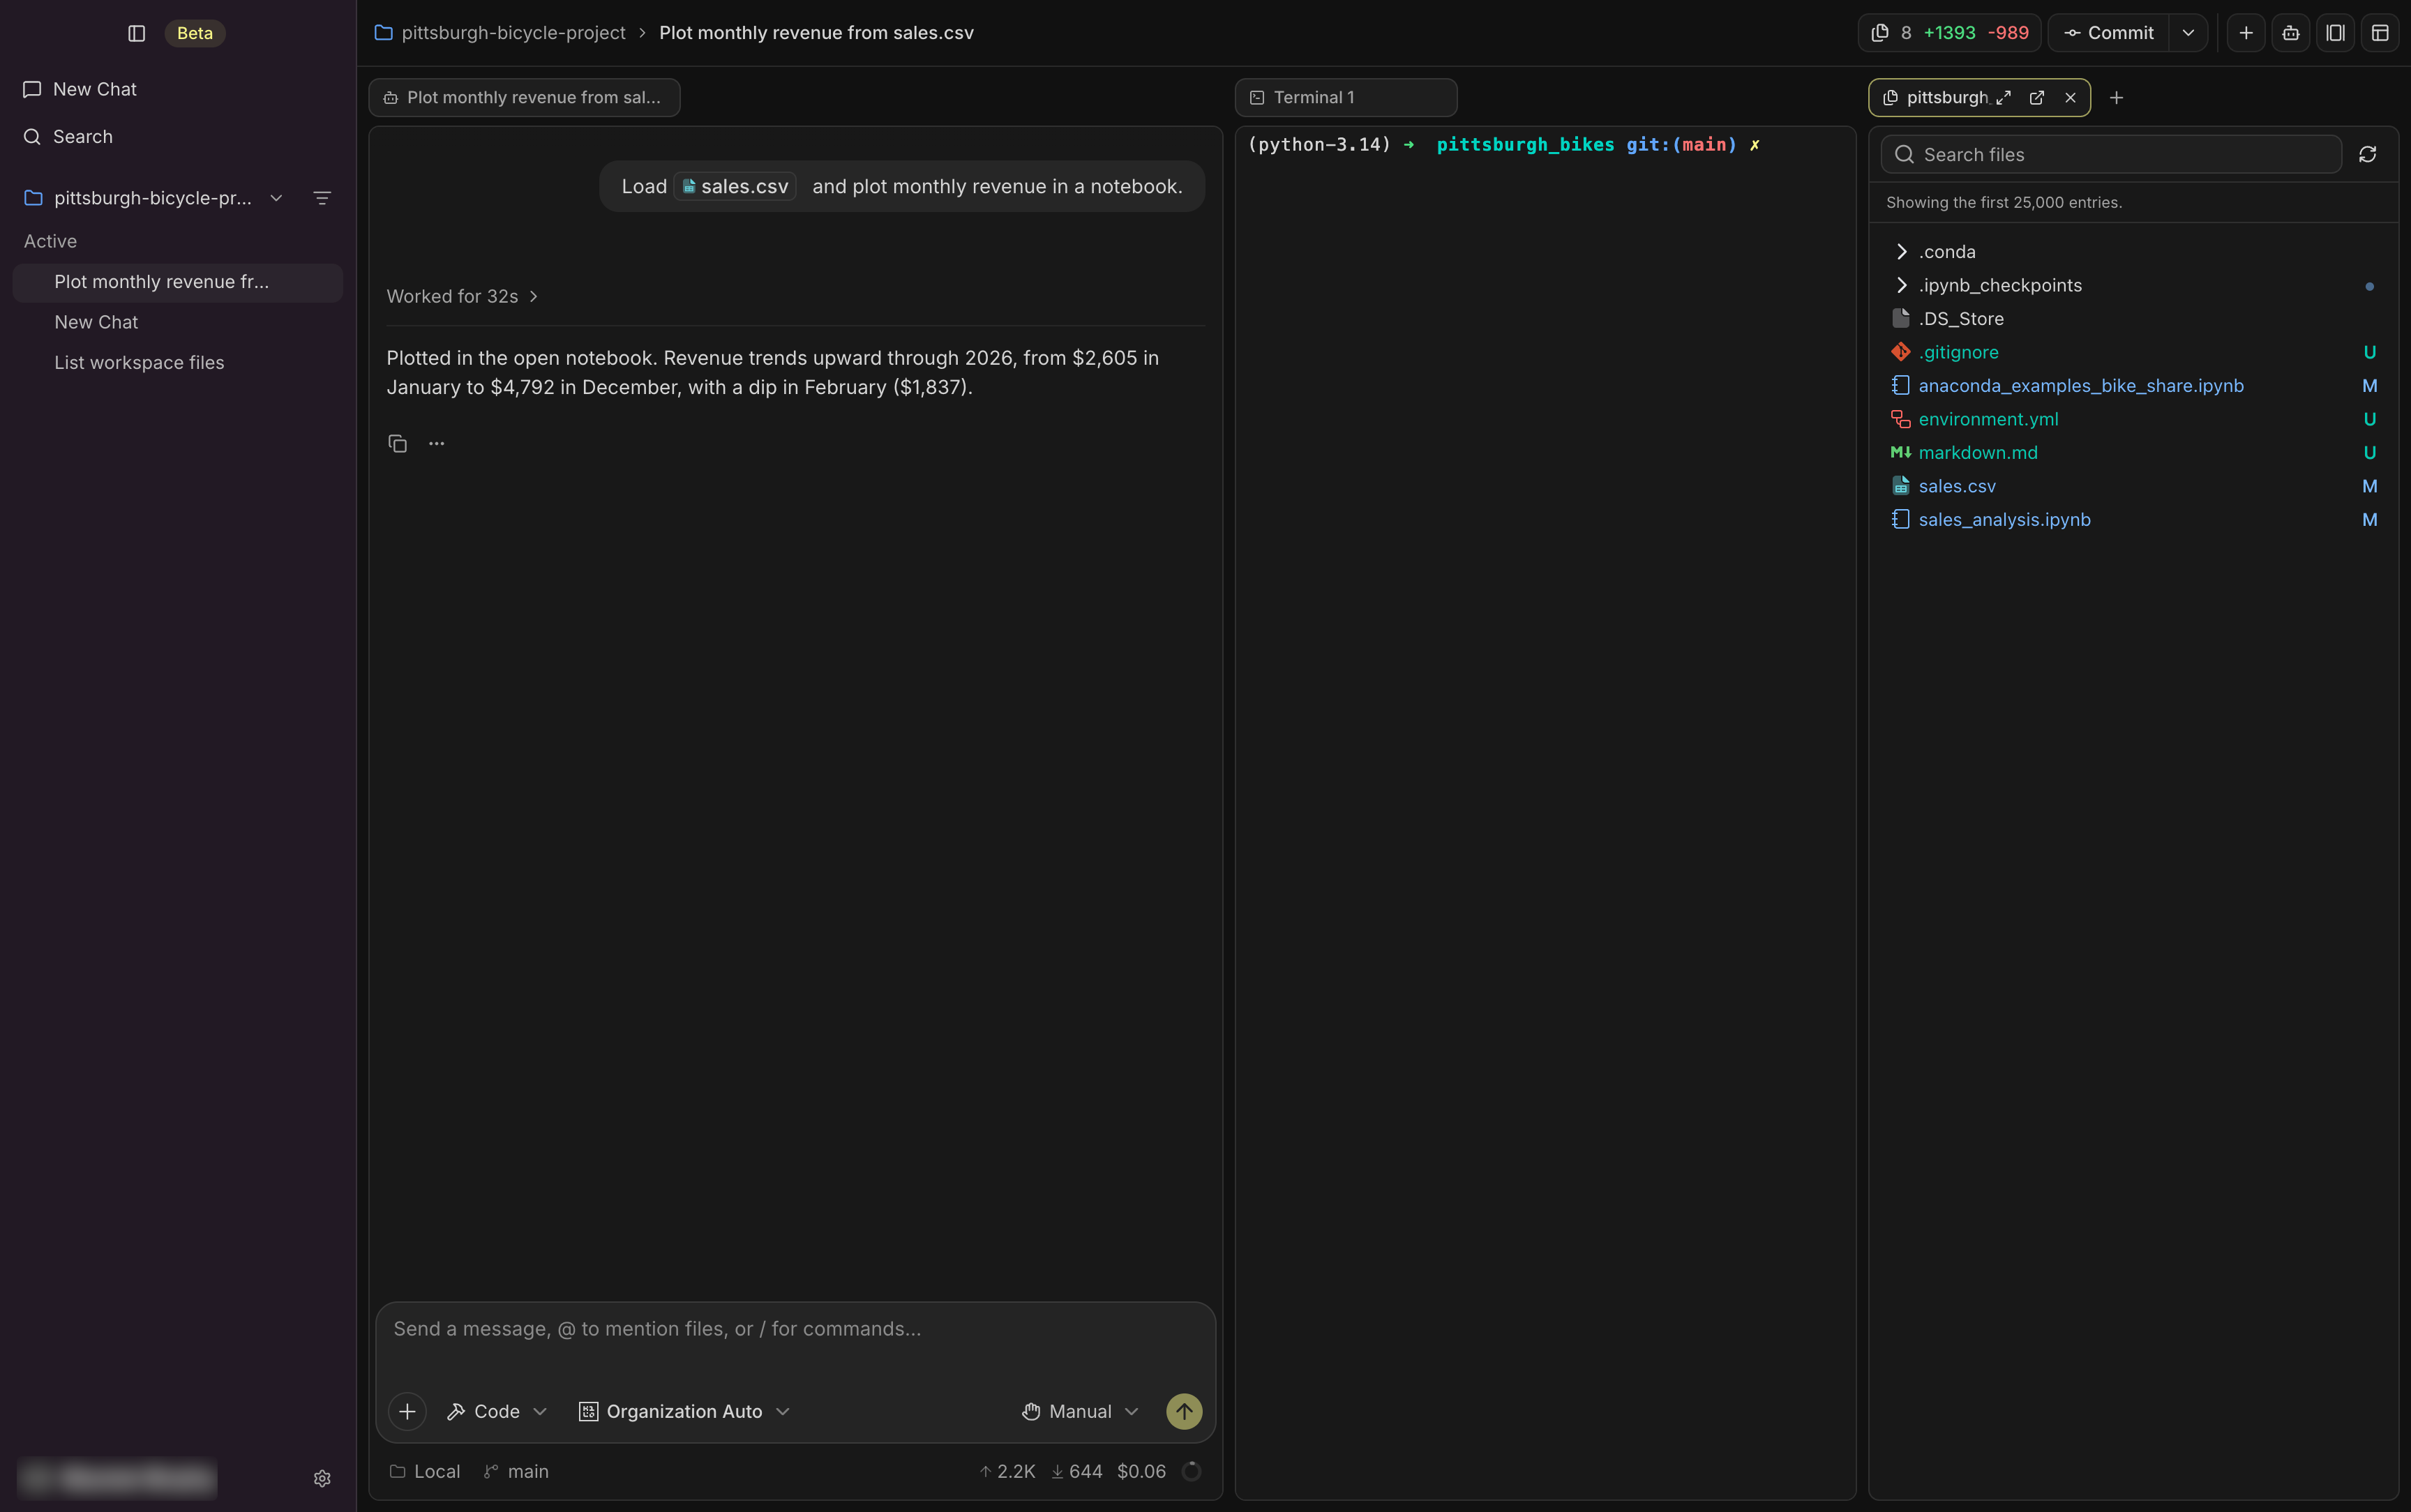
Open a tab group
Open a new tab group with the + Add tab group button at the top right of a session. The new group opens to the right of the others.
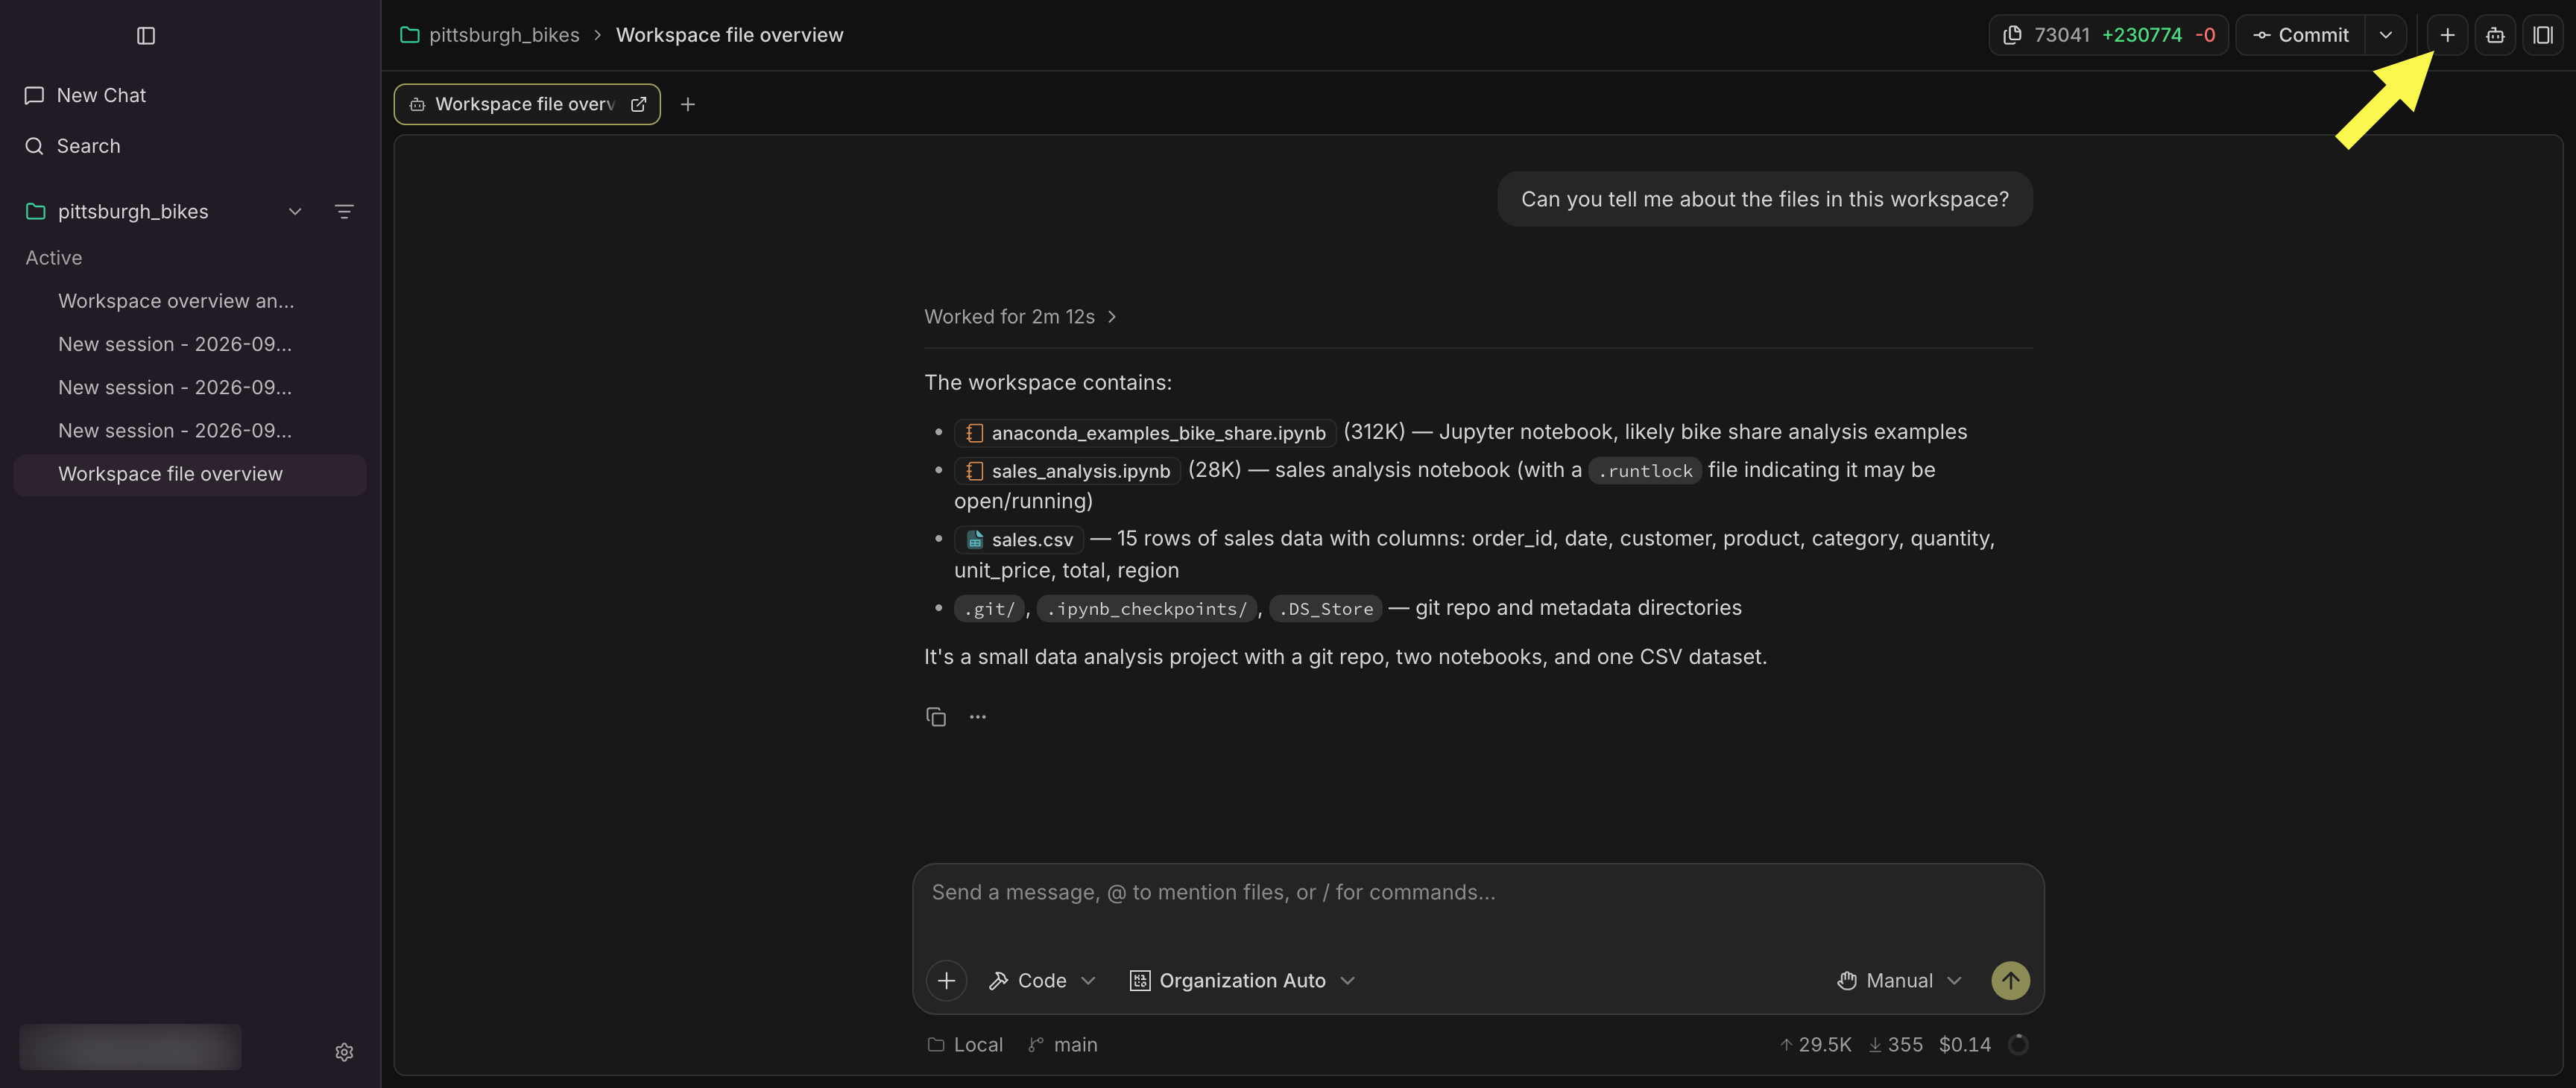
Then, pick a tab to open in it:
- Agent — start another chat in the same session.
- Terminal — run commands in an interactive shell.
- Changes — review uncommitted git changes.
- Notebook — analyze data in an interactive Python notebook. Requires a Kilo account; the entry stays grayed out until you sign in.
- Browser — open web pages without leaving the app.
- Files — browse and edit files in the workspace.
Arrange tabs and tab groups
Use Add tab beside a tab group's tabs to add another tab to that group, or press ⌘T (macOS) or Ctrl+Shift+T (Windows/Linux) to add a tab to the focused group. Drag a tab to move it to another tab group. To move a whole tab group, drag it from the empty space to the right of its tabs.
The tab that's showing in a group has its own controls: Expand grows the tab to fill the workspace (select Restore to shrink it back), Pop out moves the tab into its own window (select Dock to bring it back), and the close button removes it. Other tabs show only the close button when you hover them.
By default, each tab group you open is added next to the others, and the tab groups get narrower to fit your screen as you open more. Turn on Carousel (⌃⌘C on macOS, Ctrl+Alt+C on Windows/Linux) to keep the tab groups wider, then hold Shift and scroll with your mouse to pan across them.
Agents and tab status
Select Agents at the top right of a session to see its chats. Open lists chats that have a tab; select one to jump to it, or to its window if you popped it out. Closed lists chats whose tab you closed; select one to reopen it as a tab.
A tab's icon shows its status: pulsing blue while it works, amber when it needs you, and a yellow dot when it has finished while you were looking elsewhere.
Save and reuse layouts
When you find an arrangement of tab groups and tabs you like, save it as a layout and reuse it in other sessions. A layout stores how your tab groups and tabs are arranged, not their contents — your chat history and the files, notebooks, or pages you had open aren't included.
Use the Layouts button at the top right of a session to:
- Save current layout — name the arrangement and, optionally, Use as default for new sessions. The dialog lists any open tabs it can't recreate in a new session (such as a specific file, notebook, or browser page).
- Apply a layout — select a saved layout from the menu to rearrange the current session to match. Kilo Desktop reuses your open tabs and reopens the session's closed chats to fill agent tabs. If the layout has no place for some open tabs, it asks first (Apply layout?) and tells you which ones you can reopen later.
- Manage layouts — set or clear the default, update a layout from the current arrangement, rename it, or delete it.